Perfectly Purple

1

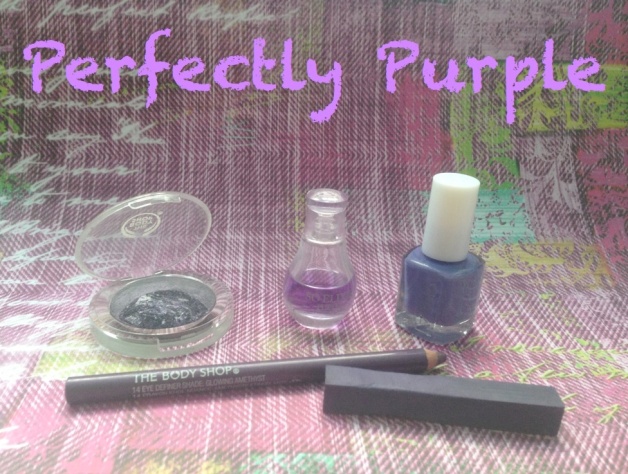
I really enjoyed doing my pink post last week and this week it’s the turn of purple. My favourite colour although I don’t have much makeup that colour which I find odd so I’ll have to go purple-cosmetics-shopping! Anyway these are the purple products I do have.

Yves Rocher So Elixir Purple – So technically this doesn’t show up purple when it’s on but it is called purple and the bottle is purple. It also smells amazing. Full review  here.

MUA Nail Polish in Frozen Yoghurt – I love this cute purple colour! I only used it for the first time yesterday and fell in love so I will review it at a later date. It is a wonderful candy-purple shade and is perfect for these last few sunny days before we hit autumn, I’m going to make the most of it while I still can!

Purple Hair Chalk – So I can’t use this right now with my red hair as it’ll clash far too much but I love it none the less and if/when I go back to a suitable colour again I’ll definitely be using it again. I have 24 different colour chalks but this is my favourite. Review here. 

The Body Shop Eye Definer in Amethyst – This eye liner is great for adding a purple pop of colour to a natural look. I only reviewed it yesterday so I won’t go into too much detail.

The Body Shop Baked to last Eye Shadow duo in Amethyst – I have discovered ow that this is best used wet and I love the vibrant purple it produces that way. It looks stunning and is really easy to work with. Don;t think I’ll ever use it dry again!

Think next week will be Glorious Green so stay tuned for that!

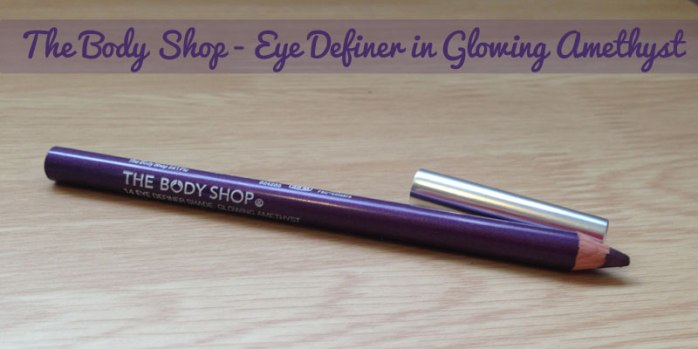
#SBBC – The Body Shop – Metallic Eye Definer Pencil in Glowing Amethyst Review

TBS1I’m loving coloured eye pencils at the moment and seeing as I bought an eye shadow this colour I decided to go all out and get the eye liner too. Unfortunately it is exactly the same colour as The Body Shop Baked to Last Amethyst eye shadow so it doesn’t show up with that. But, it looks lovely with neutral eyes to add a bit of colour instead.

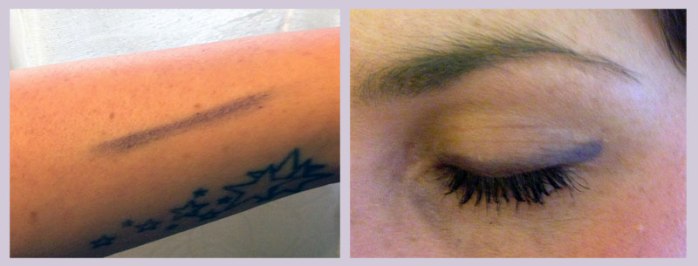
It is a lovely soft eye pencil but the colour pay-off is minimal. You really have to build it up to get a suitable result. As much as I love TBS I’m finding recently that the colours are very subtle and I prefer my look to stand out if I am going with colours over a nude look.

TBS2It has a gorgeous shimmer to, which is beautiful and when built up enough would look fantastic for an evening look. It just takes time, patience and practice to get a good result, all things I don’t have a lot of.

It is however water-resistance and it has battled the rain for me, it is also dermatologist approved so it’s great for those of us who have sensitive eyes and skin.

I  think £8 for this is a bit steep considering it is very pale and they boast a fantastic colour pay-off in the description, which just hasn’t delivered. Maybe some of the other colours would be better, I don’t know but I’m reluctant to try another one. May try the Avon Glimmer Sticks instead.

I hope that you don’t mind that today’s SBBC post is a review, got lots to catch up on and I don’t always have time to do 2 posts a day. Today is one of those very busy days, I’m writing this on my lunch break and I have a volunteer role tonight too 🙂

Jelly Pong Pong 2-in-1 Eyeliner and Eye Shadow Review

1

I have loved Jelly Pong Pong products in the past but unfortunately this one was pretty disappointing. I didn’t receive it in a colour I even like, I’m not even sure what shade it’s supposed to be but it’s a very dark green that I can only describe as swamp green.

I love multi-tasking products – when they do what they say they are going to do, unfortunately this one doesn’t do either of it’s advertised functions well.

2

The colour makes it really hard to find a purpose for it, this photo makes it look much darker than it really comes out. I braved it and tried it as both a liner and shadow and I didn’t like either. The line isn’t precise enough even when sharpened fully for a liner but it also doesn’t smudge well enough to be a decent shadow. I was so disappointed that this is basically useless to me.  I won’t even put a photo up of me wearing it because it is looked awful on me. Even when I used it as a liner it didn’t stay put for long and smudged into my poor sensitive eyes.

I would try some of the other colours, the bronze and amethyst ones both look pretty and may have been better but at £10.50 I’m not sure it’s worth the risk if I’m honest. Sorry Jelly Pong Pong it just wasn’t for me this time!

Try it: £10.50. http://jellypongpong.com/collections.asp?CategoryId=3069

Has anyone else tried this? Any better luck?

Brushes on a Budget

8Reviewed by Tams

Barry M Eye shadow and Foundation Brush Review

I truly needed some new brushes, what with all this extra use they’ve had over the last 2 months but I didn’t have a huge budget for them. I decided to give Barry M brushes a go seeing as I like most Barry M products and they’re also a fun colour. I only got the eye shadow brush and foundation brush to begin with but I will definitely be completing my set!

First up is the eye shadow brush, I got this when I was having trouble picking up the shadow in my Sleek palette. It is gorgeously soft and picks up the colour wonderfully. It’s also really good at applying the eye shadow evenly. I love this brush and use it every day now.

The foundation brush is a bit smaller than I’m used to and it also picks up a huge amount of foundation so it took some getting used to. However, it does blend in really well and leaves me with a flawless finish. Due to the size it’s really easy to be accurate and is great for someone new to using a foundation brush.

Overall I’d give these brushes a 4/5.

Try it: www.superdrug.co.uk, prices start at £2.99

Perfect red lips and subtle smokey eyes

1

So this is my favourite look for a night out.. and here’s my very handsome husband too!

I thought I’d share my all time favourite look for an evening out with you all. I don’t ever feel myself without late night red lips. I don’t have time to do them during the day but if I did I’d probably always choose them over anything else! My husband on the other hand hates them.. but only because he doesn’t also want red lips. As a result I’ve spent so much time perfecting my non-transferring red lip look.

I have included a list below of all the products I used for this look and I’ll do a quick run down on how I got there. I also styled my hair with GHD’s and covered it in Shockwaves Ultra Strong Power Hold Hairspray.

rightsize

Step one: Cleanse, Tone and Moisturise. Leave for at least 5 minutes before starting on the make-up, this will give you a perfect base to start with and hold your make-up in place longer.

Step two: Dab concealer over any problem places, blemishes and spots.

Step three: Use a liquid foundation all over that matches your skin tone well. No one wants to look tangoed!  Top tip: Use a good foundation brush rather than hands or a sponge.

Step four: Make a fish face and apply a rosy blusher to your cheek bones, don’t forget to blend.

Step five: Now it’s time to start on the eyes! Use a light grey eyeshadow right across the eyelid and up to the crease using a soft eyeshadow brush.

Step six: Use a darker grey eyeshadow with an angled brush at the corner of your eye, blending it along the crease in your eyelid and the eye line to about half way along.

Step seven: Use a nude colour eyeshadow from the crease of your eyelid to the brow. Blend all the colours gently so that they gradually move into each different colour.

Step eight: Use a good eyeliner to draw a think line right across the top eyelid and half way along the bottom one.

Step nine: Use the angled brush and black eyeshadow to gently go along over the top of the eye-line at the top.

Step 10: Use a pink highlighting cream in the corner of the eye. Apply 2/3 coats of Mascara.

Step 11: Use a highlighter just under the brow and at the top of cheeks also to define those areas.

Step 12: Time for perfect red lips! I use Benefit cupid’s Bow pencil first but I believe this has been discontinued so I won’t go into that for now. But if you are blessed in owning one still you know what to do!

Step 13: Use a red lip liner to line your lips, I also fill in the whole of my lips too as I find it make the lipstick last longer! Cover carefully with red lipstick.

Step 14: My holy grail for red lips is Lipcote, use this over the whole lips and just over the edges a little too, allow to dry and then blot. Reapply lipstick and Lipcote a second time. I like matt lips but you could always add a gloss at this point too if you wish.

Step 15: Spritz your face with The Body Shop Vitamin C Energising Face Spritz to set make up.

Then go have fun!

Product list

Organic Surge Super Intensive daily Mosituriser
Maybelline Dream Satin Liquid in Ivory 010
Benefit Cupid’s Bow
Lipcote
The Body Shop Vitamin C Energising Face Spritz
Benefit Coralista Blusher
Benefit Smokin’ Eyes
Benefit High Beam Highlighter
MAC ZoomLash Mascara
MAC Eye/Lip Liner Pencil in black
Barry M Lip Liner in Red (No 3)
Barry M Red Lipstick (No 121)